How often do you wear ponytails? They're so cute and there's nothing more trendy when you spice it up a little bit. The hair is very vital part with your everyday look. It can tell exactly how much you take care of it. And when you srtyle it, it can give a completly different look. So if you're looking for some great ways to spice up your hair, try this amazing 5min. tutorial from A Cup Of Jo.
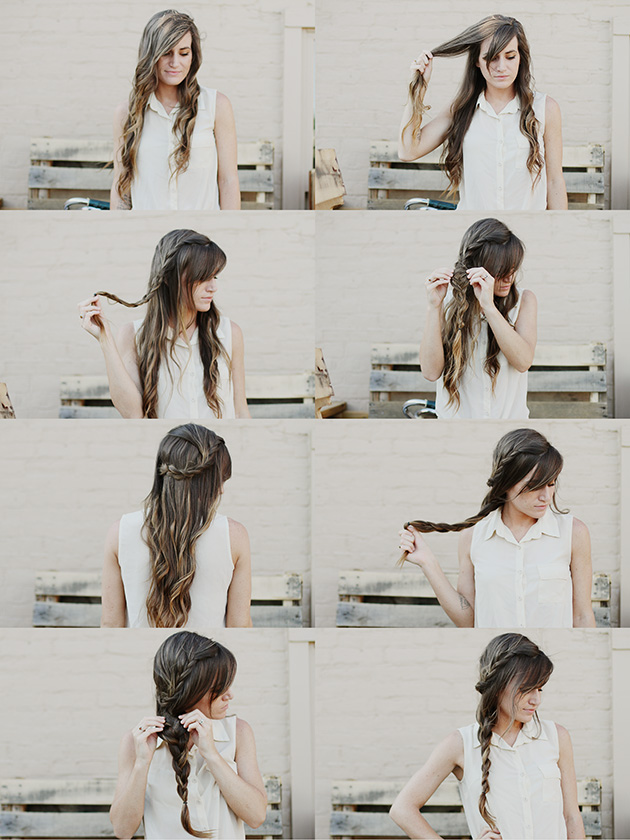
Split your hair into two sections, straight down the back, but off center, about 3/4. You want one large section, and then one smaller section that's about an inch or two away from your ear. Than take the larger section and make a ponytail, securing tightly with a rubber band. Twist the smaller section AWAY from your face. Make the twist as tight as you can, so it doesn't become too loose later on. After that, wrap the twisted section over the top of the ponytail and around to the bottom. Pin the twisted wrap in place. After you've secured the twist with enough pins, let it untwist and blend in with the rest of your ponytail. Done and done! SO easy!
2 Eylül 2012 Pazar
1 Eylül 2012 Cumartesi
Total Makeover!
See the new layout?! Well, I just made it! I also just made my Pinterest account, don't forget to follow me! My blog is really startting to grow, so I'm opening adversting on my blog! After I'm done with all the details, you can send me an e-mail, and get an adversting spot here! I'm so excited!
What do you think about the new layout?


Also don't forget to check out the tutorials! I've linked them all, but there's gonna be just this untill I update some new and old hair tutorials. You can't blame me, there's just too much of them! But, if you really want to see some more, just type in the search bar, hair. They're all tagged with it.
31 Ağustos 2012 Cuma
Summer Nights/Floral Hair Tutorial
This tutorial is very girly and femmene, perfect way to combine braids and flowers. To be presice, the cute small wildflowers. It's simple, using the overlapping technique, and the basic braid, you can get this look in no time! Thanks again to Sincerely, Kinsey for sharing this amazing tutorial.
Preparation: You can curl your hair a day before, just so it will be easy to work with it. You'll need bobby pins and wildflowers (real or faux). Ok, start with your hair down. Begin with a small strand from each side of your head, close to your ear, warp it around to the opposite side and pin it (like in this tutorial). Repeat the process ntill you get the look from the fourth picture. After that, create a semi-loose braid with the best of your hair. Lastly, add flowers throughout your braid!
Have a nice day friends!
30 Ağustos 2012 Perşembe
Perfect Top Knot
There's nothing more atractive than a beautiful messy top knot. If you're running late on a date, or something, there's an easy technique to achieve. It's most known as the french twist. Or a knot, I'm not sure.Take a try on this amazing hair tutorial from A Cup Of Jo, that will blow you away. Would you ever wear your hair into a knot?
"1-2. Start putting your hair into a high ponytail, but don't pull the hair all the way through the rubber band. You want to end up with a little loop on top with some hair left over at the bottom. (By the way, I love doing a top knot on hair that isn't combed through, so I use my fingers to get my hair into place; that way, keeps some of the imperfect lumps and bumps. If you prefer a more polished look, you can comb your hair into a sleeker ponytail.) Tip: If your hair isn't quite long enough to get a top knot, you can also wear the knot lower down on your head.
3. Take the section of hair that's free from the rubber band and twist it.
4. Take the twist and wrap it around the base of the little loop of hair you created. If you have long hair, you may need to wrap it more than once. If you are wrapping it a few times, do it loosely…you don't want it too tight and rigid.
5-6. Use bobby pins to pin the bun in place. I like to secure my bun with four pins: one in the front, one in the back and one on either side. You may have to use more if you have thicker hair. I've also found that "U" shaped pins work better to hold thicker hair. These specific pins are great because they have a rubberized texture that helps grip hair."
26 Ağustos 2012 Pazar
Get The Look: Taylor Swift
Hey everyone! Lately I've been thinking about adding something new and fresh to my blog, like a new column. Or something like that. And in the same time share with you my celebrity style icons and their amazing closet. So whenever I feel like writing, I can always turn to a little research and celebrities.
First on my list is the amazing Taylor Swift. I will be honest, I rescently became a fan of hers, well more a fan of her style. Maybe because of her new hairstyle. Those bangs really gave her a little more sophisticated look. And It suits her perfectly. And almost everything she wears is perfect for everyday wear.
On the right side you can see a very simple but chic combination of a basic white shirt, and black pants with very small dots on it. I also like the cute cardigan. It's risky to wear a cardigan with such a formal look, but the awesome Ray-Bans gave it a completely different outlook.
shirt: MISS SELFRIDGE
pants: GENERAL PANTS
bag: LAUREN MERKIN STEVIE SATCHEL
shirt: DIZZY STRIPE HENLEY SHIRT
jeans: SUD EXPRES JEAN SLIM ORANGE (sold out)
bag: LAUREN MERKIN STEVIE SATCHEL
img source
On the left side you can see a very navy combination with red jeans. Again with the Ray-Bans, but I just love it. This is a perfect everyday style that suits everyone, and it's very easy to achieve.
shirt: DIZZY STRIPE HENLEY SHIRT
jeans: SUD EXPRES JEAN SLIM ORANGE (sold out)
bag: LAUREN MERKIN STEVIE SATCHEL
img source
When I see this look it reminds me of London. I don't know why, honestly. However I really seem to like it even thought I'm not a big fan of wearing yellow or that navy blue as a color. But, Taylor did a great job there!
sweater: RALPH LAUREN
skirt: SHANNON SKIRT BY MOTEL
bag: FENDI
Sooo this is the look I definitely love the most. It's a stylish and casual. Red lipstick looks great with the whole combination, and Ray-Bans also. It's really Manhattan, without much effort. The vintage sunglasses in a cat eye shape gives it just enough glam and fills the look. Not much, but beautiful.
shirt: MISS SELFRIDGE
shorts: DR. DENIM
sunglasses: ELIZABETH AND JAMES
bag: COACH
img source; made by me
Taylor is promoting her new single and new album 'Red' that's coming out this October and I can't be more excited! This is another chic & basic look styled with a red lipstick and Ray-Bans. Vintage, and always IN, Taylor keeps surprising people with her own sense of style. She is original, and that's what I love about her.
shirt: NASTY GAL
shorts: FOREVER 21
shoes: SORVAGUR
Say if it helped by leaving a comment! Happy Sunday friends!
Etiketler:
fashion,
get the look,
style,
taylor swift,
trend
25 Ağustos 2012 Cumartesi
Quick Twisted Buns
Well since I have my not-so-new short hairstyle for a while now, I'm starrting to miss my long hair... Don't get me wrong, I like my short hair, bu sometimes I miss the freedom of trying all kinds of hairstyles. So, A Beautifull Mess maybe heard me, and made a post about four quick and easy hair tutorials for short hair. They are pretty good, so go and check them out here! This only one of them:
Separate your hair into three ponytails. Then twist the pony into small a bun and secure with bobby pins. Continue like that untill you finish the look! And done!
22 Ağustos 2012 Çarşamba
Double Braid
This is not a two braids into one hair tutorial, well actually it will just look like that. But, it's not hard at all, trust me. During the summertime it's nice to take out your ripped up denim shorts and a cute top with a tomboy denim shirt. And try this cute hairstyle! I've found this tutorial on Sincerely, Kinsey and I'm really starrting to love that blog. This beautiful hair tutorial is quick and it looks great with everything.
Preparation: a small rubber band hair tie, a few bobby pins.
Begin with your hair down. Take a section of yor hair from the thicker side of your hair, and braid all the way down. It will lie flat on your head best if you angle it back as you're braiding it. Next, slightly tug all along the braid, to make it look thicker. One the braid is done, pin it on the back far side of your head underneath the top layers of your hair, covering the bobby pin. After that braid the rest your hair into a side braid. Do the same thing like with the frirst braid, tug it all the way down. If the wind isin't cooperating, take a few spritz of hairspray to keep it in place.Happy Wednesday friedns!
Kaydol:
Kayıtlar (Atom)