Hello you guys! Yes! It's official! Our new layout is finally done! I really hope you like it. Just to be clear, the picture that I've used is just a picture that I found on some random tumblr page. It's not my propriety. But even thought It hasn't been taken by me or something like that, I really really hope that you like the complete new layout. Leave me a comment!
3 Temmuz 2012 Salı
29 Haziran 2012 Cuma
Working on a new design...
Hey everyone! For the last few weeks I've been working on this design. Well actually trying to come out with it. So I'm apologizing in advance if something goes wrong. I hope you'll like it! I'm starting tomorrow.
And while you're waiting, vote for my friend's picture here. It's an online contest and it really means a lot!
And while you're waiting, vote for my friend's picture here. It's an online contest and it really means a lot!
28 Haziran 2012 Perşembe
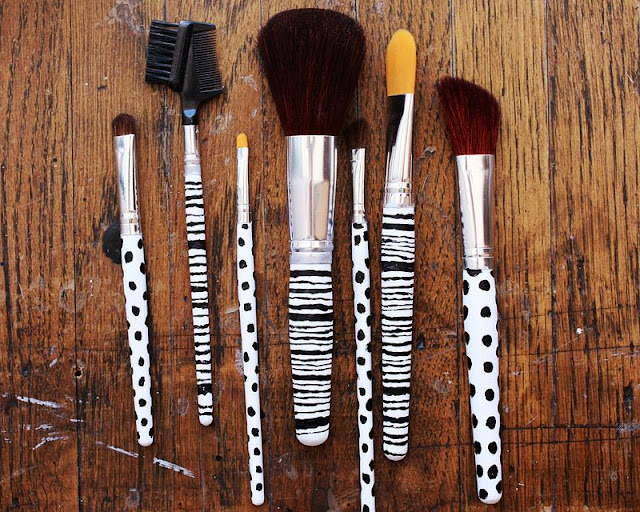
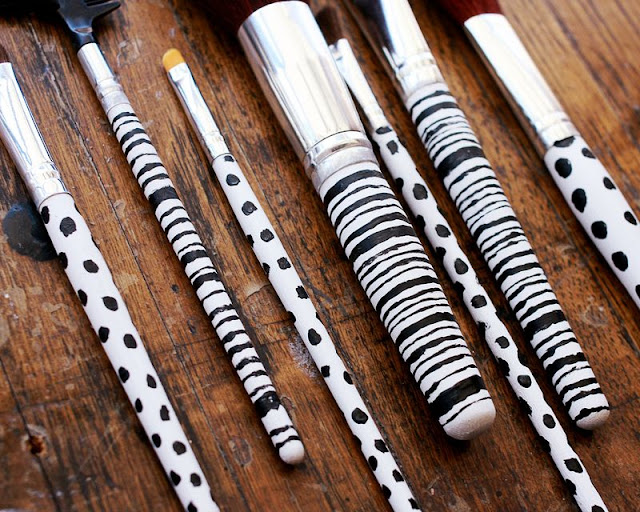
DIY: Custom Makeup Brushes
It's been a long time since the last DIY project post. So I'm very excited for you to see the new project! I've always loved the little things. Especially something that I make by myself. And I also like to paint design on everything! So, I'm sure that this cute patterned brushes will make you happy every morning when you are getting ready.
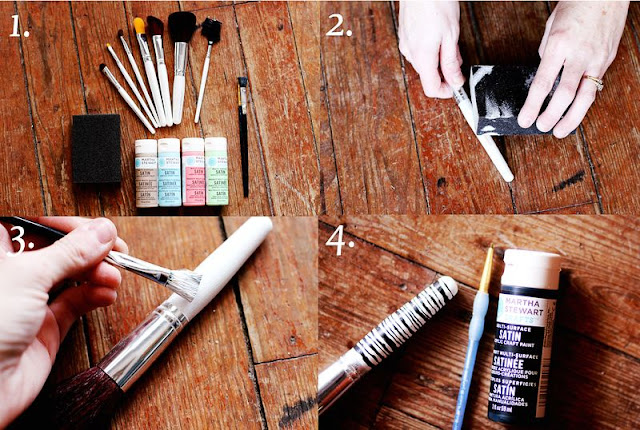
Supplies: wooden makeup brushes, craft paint ( in this case - Martha Stewart ), paint brushes and a sanding block. Start by sanding down your brush handles. Unless the wood was already unfinished, this will help the paint to cling to the surface. Then paint the base coat. If you need to, add a second coat. After that paint a pretty design. They chose polka dots and stripes with a messy handmade look! Just have fun!
 |
| Originally found on X |
 |
| Originally found on X |
 |
| Originally found on X |
25 Haziran 2012 Pazartesi
How To: Little Messy Top Bun
This is probably my most worn hairstyle in the last few weeks. Partly because summer began and the sun is burning. But this can be also a very good cover-up when your hair is all greasily. It's practically my super hero. Hahaha. Unfortunately, I don't have a picture to show you the final result of this less than a minute hair tutorial. The braid on the bangs is not necessary, you can skip that step. Loose bangs are always a hit. Just twist your hair and then warp it up in a bun and secure it with a few bobby pins.
22 Haziran 2012 Cuma
Style A Top Knot
For the last few weeks I've discovered that messy buns became my favorite hairstyle. I don't know why, maybe it's because outside here is hot as hell, or just my hair looks better that way. Anyway, while I was scrolling through one of my favorite blogs - Beautiful Mess, I've found this amazing tutorial. And as you already know, I always try to bring to you the best & easiest hair tutorials from all over the web. So I think for my 100 post, this one is perfect.
First tie your hair into a ponytail at the top of your head. Then use a comb to brush down and through your hair, tease it. If your hair is thin or fine, make sure to tease as many strands of your pony as you can. That will give the bun volume and body. After that twist your hair around your hand and tail base. Pull the end of your hair through. Tease and style the top knot, and if you want, you can also spray on a little hair spray.
21 Haziran 2012 Perşembe
DIY: Summer Feather Hair Accessories
Hey everyone! If someone would ask me what is my favorite hair accessory, the answer would be simple. Hair feathers! It's very popular and gives a fresh & earthy look. And celebrities love it! It fills the California Cool look. So the items you're going to need, you probably already have at home. I like it that way.
1. INGREDIENTS: old t-shirt, hair clip, scissors, super glue, twine, and feathers.
2. Cut or strip t-shirt into strips. Cut it so that the's 3 different lengths of fabric. One really long, one medium length and one shorter length. You can even tie the ends together for a detailed look.
3. Attach t-shirt fabric to clip. Using the twine I simply tied and tightly knotted the fabric onto the end of the clip.
4. Warp twine around t-shirt strips. Wind the twine around all the fabric pieces separately.
5. Super glue the end of the feather.
6. Slip the glued feather through the wrapped twine.
7. Secure the feather with a snipped of twine. Knot it good.
8. So, repeat it 7-8 times until you get the right amount of feathers and twine. And then place the hair-piece in the back ( at the roots ) underneath your hair. Good luck!
19 Haziran 2012 Salı
Dolly Look Hairstyle
I don't know about you, but I never tried something like this. And honestly, I really want to (just for fun). But there's a problem - my hair is stick straight. That is a reason why I'm sticking to my favorite curling iron. So if you don't have any hair rollers and you have the same problem as I do, feel free to use and iron ( but make sure that's big ). Amazing Katie did this tutorial! I adore her! You should have fun with this adorable hairstyle.
Let's begin!
Let's begin!
Begin at the top of the head ( near by the ear ), take a section of hair and spray the underside with hair spray. Then tease the underside of the hair and continue down until you tease it all. Flip the hair over and smooth only the top. after that, begin rolling the hair into the hot rollers by starting at the top middle section. Continue like that - doing the sides next, and then finish up with the back. Now let the rollers in the hair cool down....
Unroll the hair from the curlers and start at the bottom and work your way to the top. Tease your bangs or front section of the hair. After that curl the bangs and any other face-framing pieces that may not have made into hair rollers. Pull the curled bangs up and to the side. Then - hair spray! Use a veil of it to keep that volume and curls in place. Have fun!
Kaydol:
Kayıtlar (Atom)


.jpg)


